
First Time Riding a Street Kart in Tokyo? What to Know Before You Take Photos and Videos, Step by Step
First Time Riding a Street Kart in Tokyo? What to Know Before You Take Photos and Videos, Step by Step
The light turns green, and the guide up front slowly pulls away. In front of you is the Shibuya crowd. You'll want to grab the phone in your pocket right then. But hold on!
When people ride a street kart in Tokyo for the first time, the thing they worry about most often isn't the driving. It's "How do I get good photos and videos?" In Taiwan, when you go out with friends, the first thing you do is pāizhào (拍照, take photos). Plenty of people feel the same way, and that makes sense. People in Japan want to share their travel memories on social media too. But this experience has you driving through city streets, so there's a trick to knowing when to shoot.
This article covers how to get your photos and videos, in order, from before you book until after your ride. If you know the flow ahead of time, you won't be scrambling on the day. Let's go!
Step 1: Before Booking, Pick the One Thing You Want to Remember
The first thing to do isn't getting your gear ready. It's deciding the one thing you want to take home from this experience.
Honestly, if you try to capture everything, you won't capture anything well. Is it your friends' faces as everyone gets excited? Is it Tokyo's scenery? Or is it you with your hands on the wheel? Once you've picked one, what to shoot before and after the tour mostly sorts itself out.
This choice also decides which location you book. There are seven locations in Tokyo. The two Akihabara locations are almost in the same place, and so are Shibuya and Shibuya ANNEX. Each location has its own route, so the easiest way to choose is to ask yourself what kind of scenery you want to drive through.
The Shibuya route covers the Scramble Crossing, the zelkova-lined avenue of Omotesando, and the area around Harajuku's Takeshita Street. The Akihabara routes pass the signs of Electric Town, the red-brick Marunouchi Building of Tokyo Station, and Ginza's Chuo-dori. The Tokyo Bay route has the Rainbow Bridge over Tokyo Bay, with the 333 m Tokyo Tower in the distance. From the Shinagawa location, you see the waterfront and the Rainbow Bridge from the Shinagawa side.
Don't those names alone get your heart racing?
If you're going as a group, decide who will take the photos ahead of time. When everyone shoots on their own phone, you end up with dozens of near-identical pictures and, surprisingly often, not a single one with the whole group in it. Decide whose phone takes the pre-departure shot and where you'll gather and share the photos after the ride. For a group of friends from Taiwan, setting up a LINE album in advance is probably the quickest option.
Timing your booking matters too. Weekends fill up fast, so once you've settled on a date, book early. Bookings are accepted via Facebook, LINE, and email. Contact details and the latest information are on the Street Kart official website. Prices change by season and time slot, so check current rates on the official site (kart.st). Tour length also varies by route and plan, so check that while you're there.
Think about what to bring from a photographer's point of view, too. Besides your phone, a power bank and a small bag that fits on the kart are useful. The locations have lockers for small items, but they're not meant for large luggage like suitcases. Traveling light instead of hauling lots of camera gear also makes it easier to walk around the city after the ride.
The night before, charge your phone fully and check that you have enough free storage for photos and videos. Video uses more space than you'd think. If your phone is full of photos you've taken earlier in the trip, you won't be able to save the shot you want most. Even deleting unneeded screenshots helps.
For people visiting Japan for the first time, the driver's license requirements are probably the biggest worry. What you need depends on your country and license type, so be sure to check the official website before booking. Don't go ahead thinking "it'll probably be fine"!
Step 2: At the Location Before Departure, Check the Photography Rules
When you arrive on the day, you'll start with a briefing. On tour day, guidance is generally in English. Whether you can get guidance in Japanese or other languages depends on the staff that day, so it can't be promised. The official website is available in 22 languages, though, so if you have questions, contact them through the site beforehand.
This is when to check the photography rules. Can you mount a camera somewhere? Where should you keep your phone? Don't decide these things yourself. Ask the staff. "Ask first, then decide whether to shoot" is also the basic rule for taking photos in Japan.
There's one more photo-related rule to know about. Street Kart's terms include a clause saying participants waive copyright, portrait rights, and publicity rights to photos taken during the tour. If you're concerned about how photos showing your face will be used, read the terms on the official website before booking.
While we're at it, a note on how things work in Japan. Some people here are uncomfortable with photos of strangers' faces clearly shown on social media, and some shops don't allow photography. At a night market in Taiwan, you can casually point a camera at someone and get a smile back. In Japan, you might want to be a little more careful. If passersby end up in your shot, use a wide angle where faces can't be recognized, or blur them before posting.
And! The time before departure is actually the golden hour for photos.
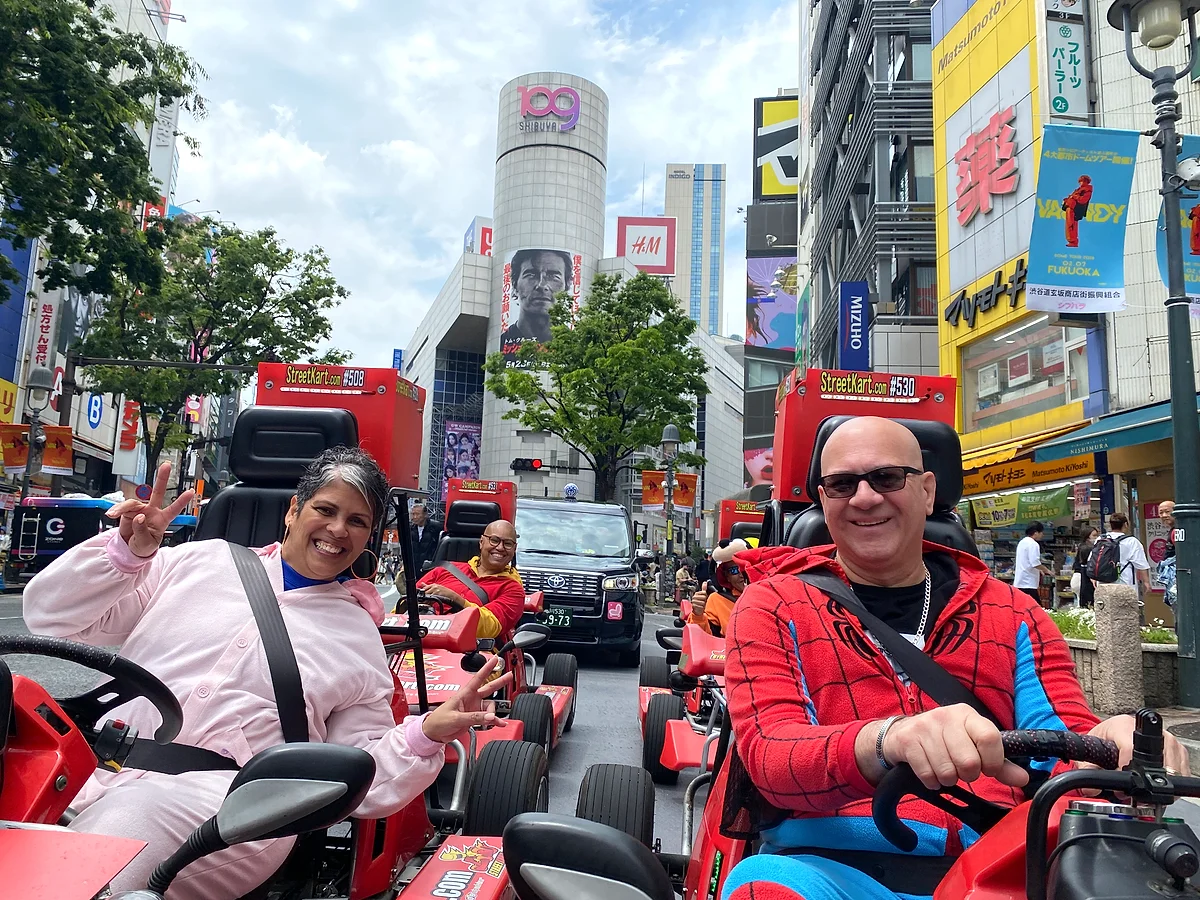
Those few minutes after you're in the kart but haven't started moving yet: your friends are lined up, their faces a mix of nerves and excitement. A shot taken now is often the one that hits you hardest when you look back later.
Everyone will be wearing a helmet in that shot. Helmets are required for everyone and come free, along with goggles. Instead of fussing over your hair, it's better to just enjoy how you all look in helmets. Closed-toe shoes and comfortable clothes are recommended, and you're asked to avoid skirts and heels. Put comfort for driving ahead of looking good in photos.
Just shoot only as long as you're not getting in the way of anyone else's preparation. Once the guide starts the briefing, put your phone away.
At reception, there's a license check and a safety briefing, and several other steps before departure. Check the meeting time in your booking information and arrive with some time to spare. If you rush in at the last minute, you won't have time to listen properly to the briefing, let alone take photos. This is also a good time to put things you won't need while driving, like your wallet or jacket, in a small-item locker.
Step 3: While Driving, Remember It with Your Eyes and Ears, Not a Camera
This is the most important part of this article.
Don't shoot while you're driving. Make that a firm rule.
The reason is simple. The karts run on public roads, in the same traffic as cars and buses. Japan drives on the left, and the signals and signs may be different from back home. Follow the guide in front, obey Japanese traffic rules, and keep your distance from the friends behind you. For a first-timer, that alone takes all your attention. Honestly, you won't have a free hand for a phone. Each kart holds one person, and passengers aren't allowed. Everyone is a driver.
The tour follows a set route led by a guide. Along the way there are stops at photo spots. Check with the staff on the day about when you can take photos. Only shoot when you've stopped. While you're moving, put everything into driving.
To avoid fumbling when you stop, decide on your shot before you set off. Do you want the kart and the background together, or a close-up of your friends' faces? If you know, you can snap a few quickly and put your phone away. The stop belongs to the whole group, so don't hold everyone up by lingering for your own shot. When the guide signals it's time to go, put your phone away even if you're mid-shot. And no matter how much you like a view, never stop on your own to take photos anywhere other than the designated spots.
That's exactly why you remember it with your eyes and ears.
Picture this for a moment.
The seat is low, so the asphalt feels much closer than usual. There's no roof, so the wind that's come through the gaps between buildings hits your cheeks directly. When you wait at a light, the voices of people walking right beside you and the sounds of cars reach your ears directly, not through a car window.
At the Shibuya Scramble Crossing, the moment the light changes, the crowd surges forward all at once. And you're right there beside it. On the Tokyo Bay route in the evening, you should be able to see the Rainbow Bridge lit up at night in seven colors.
You'll remember scenes like these better if you see them with your own eyes rather than through a phone screen. You can take photos later. But Tokyo as seen from a kart is something you can only see in that moment.
If you want to record video, follow the rules you checked in Step 2. Whether it's possible at all, and how to mount anything, is for the staff to decide, not you.
The weather changes the mood of your photos too. Tours run as scheduled in light to moderate rain, and raincoats are provided free. On rainy days, be extra careful about where you keep your phone so it doesn't get wet. Tours are canceled in heavy rain or typhoons, so check the official website for how cancellations are handled.
Step 4: After the Ride, Shoot and Write While the Memory Is Fresh
Once the tour is over and you're back at the location, it's time to shoot again!
Your faces right after you get out look nothing like they did before departure. Hair blown everywhere, and everyone smiling. Put the "before and after" side by side and you've got a story right there. For a TikTok or Instagram Reel, you can cut a 15-second clip that jumps from nervous faces before departure to big smiles after the ride. Just joining the two photos in CapCut or Jianying (剪映) is enough.
Depending on the service, receiving photo data may be part of the post-tour process. Check on the official website when booking whether your reservation includes this. If you know ahead of time, you can plan how to combine those photos with the ones on your own phone.
And this one I really mean: write notes.
Your phone's notes app is fine. Write down what you remember on the same day as your ride. What you saw at which intersection. What the wind smelled like. What the guide said in English. Who you rode with, and who shouted where. The things that don't show up in photos are exactly what you'll have forgotten a week later. These notes will also help when you write captions for your posts.
Back up your photos that same day, too. If you lose or break your phone during the trip, that shot goes with it. Uploading to the cloud or adding them to the shared album you set up in Step 1 is enough. Before posting, take one more look to make sure no strangers' faces are clearly visible.
After the tour, walking around the area and taking photos is also a good idea. From here on, these are places you can stop by on foot before or after the experience, not stops on the tour route. From the Shibuya location, the Scramble Crossing and the Hachiko statue are about a 10-minute walk. The area around Akihabara Location 1 is Electric Town itself, so as soon as you start walking you're surrounded by glowing signs. From the Shinagawa location, it's about a 5-minute walk to the stone-step torii gate at Shinagawa Shrine. Odaiba is about 10 minutes by car from the Tokyo Bay location.
For hashtags, besides place names like "#東京" (Tokyo) and "#渋谷" (Shibuya), the Chinese "#東京旅行" (Tokyo travel) works as-is. Japanese and Traditional Chinese use the same characters, so friends across Asia can read it easily. Sharing kanji is a nice little perk of traveling in Japan.
Shoot Before and After. While Driving, Take In Tokyo with All Your Senses
The day you ride a kart in Tokyo for the first time, the approach to photos and videos is actually very simple. Pick one thing you want to remember. Check the rules before departure. Forget the camera while you're driving. And after the ride, shoot and write while the memory is fresh.
Preparation starts with charging your phone the night before and ends with a backup that same day. Think of it that way and you'll know exactly what to do on the day.
Stick to this order and you won't miss either the shot for social media or the memories that are yours alone. That photo of you all laughing with wind-wrecked hair after the ride is one you'll want to look at again and again.
Once you've chosen your location and route, start by checking the latest information and booking contacts on the Street Kart official website. Weekends fill up fast, so once your dates are set, get in touch early.
Feeling the wind on your face and seeing Tokyo's streets from lower down than usual. That day is almost here!
This article was originally written in Japanese and translated using AI. Some expressions may read unnaturally, and we appreciate your understanding. For the most accurate and up-to-date information, please refer to the official site at kart.st.
Street Kart is not affiliated with Nintendo or the Mario Kart series in any way. We do not provide costumes of Nintendo characters, and such costumes may not be worn during tours even if brought by participants.